

- Integrate the VKYC process directly into your web or mobile application.
- Provide a seamless in-app experience for customers without redirecting them.
- Support an OTP-less flow if the customer is already authenticated in your application.
- Use SDK callbacks to handle events such as success, failure, or closure, and to track activity and customise your user interface.
- Generate a unique VKYC link for each customer.
- Share the link via SMS, email, or any external channel.
- Allow customers to complete the VKYC process outside your application.
- Integrating using the SDK
- Integrating using the APIs
The VKYC SDK supports Web, Android, and iOS platforms and communicates securely with Cashfree servers through callbacks.This topic includes the following sections: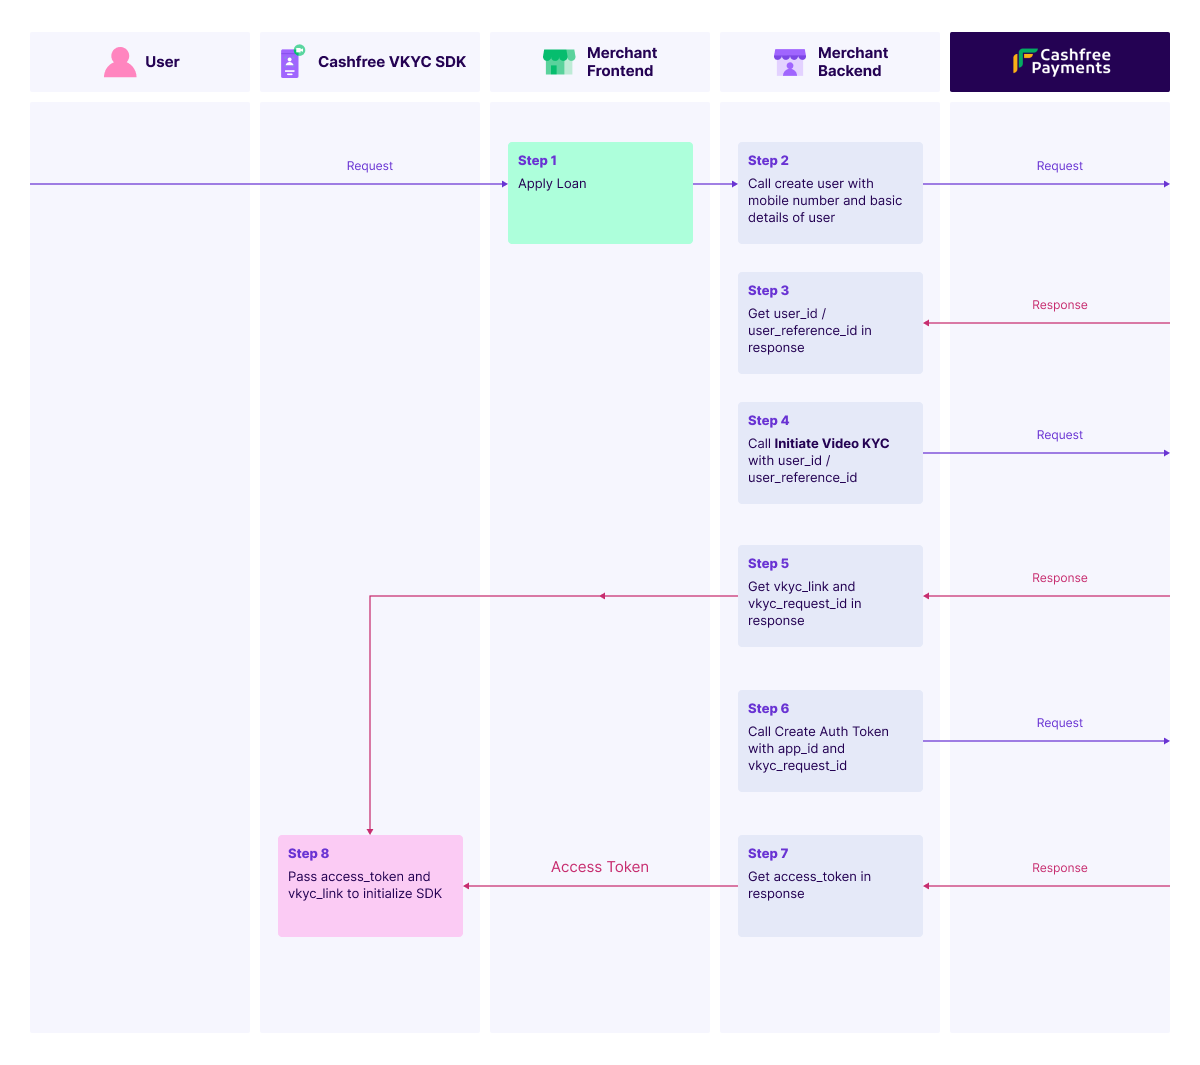
SDK VKYC flow
Refer to the steps below for the VKYC flow for SDK:- Create the user using the Create User for Secure ID Suite API. You must complete this step before initiating the VKYC session.
- Start the VKYC session using the Initiate Video KYC Request API. Pass the user ID and authentication token to the SDK.
- Generate an authentication token using the Create Auth Token API. This token is required to initialise the SDK. Use it to bypass OTP verification if the user is already authenticated in your application.
- Retrieve the current session status using the Get Video KYC Status API.
- Configure webhooks to receive real-time updates on VKYC events. For more information, refer to Webhook.
Initialising SDK
Refer to the instructions below to initialise the SDK for your target platform. The SDK communicates with Cashfree and provides real-time updates through callbacks.You can initialise the SDK for:Web integration
Initialise the Web SDKRefer to the example code snippet below to initialise the Web SDK: Do not pass the OAuth token if you want Cashfree to perform the OTP check.
-
Add the SDK script for your environment.
Production environment:
Sandbox environment:
-
Include a
<div>for the SDK container.
Android native integration
Add the SDK dependencyRefer to the steps below to add the SDK to your Android project.-
Add the Maven repository in
settings.gradle.kts. -
Add the SDK dependency in
build.gradle.kts. - Click Sync Now in Android Studio to sync your project.
-
Create an instance of the verification service.
-
Configure the callback to handle verification responses.
-
Initiate the verification process.
iOS native integration
The following are the requirements before integrating the iOS SDK:- iOS version: 13.0 or later
- Swift version: 5.0 or later
- Xcode version: 14.0 or later
- Open your Xcode project.
- Go to File > Add Packages.
-
Enter the repository URL:
- Select the version and add the package to your project.
-
Create an instance.
-
Set up callback handlers.
-
Start the VKYC session.
Callback structure
Refer to the sample response below for the VKYC callback structure:Additional Notes:
- Ensure the
<div>with IDcf-vkyc-sdkexists in your HTML. - The SDK applies default styling for consistent behaviour. Custom styling is not supported.
- The embedded iframe uses sandboxing for secure interactions.